#format axis numbers of chart
Explore tagged Tumblr posts
Visit Tumblr Blog
Explore Tumblr blogs with no restrictions, modern design and the best experience.
Last Seen Tumblr Blogs


Fun Fact
Hackers stole 65M passwords from Tumblr in 2013.
Text
Decoding the FTSE Chart
Headlines
A FTSE chart visually represents the index's historical price movements.
It aids in understanding market trends and patterns over time.
Various timeframes can be analyzed on a FTSE chart for different insights.
A ftse chart serves as a visual record of the price movements of a particular FTSE index, such as the FTSE 100 (UKX) or FTSE 250 (NMX), over a specific period. These charts are essential tools for market participants, providing a clear and immediate understanding of past performance and prevailing market trends. By plotting price data points, a FTSE chart enables the identification of patterns, support and resistance levels, and overall market direction, which can be valuable for informed decision-making. The ability to customize timeframes allows for both short-term and long-term perspectives on the index's trajectory.
Elements of a FTSE Chart
Typically, a FTSE chart displays price on the vertical axis and time on the horizontal axis. Various chart types can be used, including line charts, bar charts, and candlestick charts, each offering different levels of detail about the price action. Candlestick charts, for instance, provide information about the opening, closing, high, and low prices within each period, offering a comprehensive view of market sentiment. Volume, which indicates the number of shares traded, is often displayed alongside the price chart, providing insights into the strength of price movements. The interplay of price and volume can offer clues about market conviction behind trends.
Analyzing Trends and Patterns
Market participants frequently use FTSE charts to identify trends, which are sustained movements in a particular direction. An upward trend, for example, indicates a period of general price appreciation, while a downward trend suggests a period of decline. Charts also reveal various patterns, such as head and shoulders, triangles, or flags, which are formations that some believe can indicate future price behavior. These patterns can be observed across different timeframes, from intraday charts to monthly or annual charts, offering different scales of analysis. Understanding these visual cues is a fundamental aspect of interpreting market data.
Support and Resistance Levels
Another critical aspect of analyzing a FTSE chart involves identifying support and resistance levels. Support levels are price points where a downward trend might pause or reverse due to increased buying interest. Conversely, resistance levels are price points where an upward trend might face selling pressure, causing it to pause or reverse. These levels are often formed by previous highs or lows and can act as psychological barriers for market participants. The breaking of a significant support or resistance level can be interpreted as a strong signal of a continuing trend or a reversal.
Practical Applications of FTSE Charts
The practical applications of a FTSE chart extend to various aspects of market participation. For those focused on short-term movements, intraday charts provide a granular view of price action, helping to identify entry and exit points. Long-term participants may use weekly or monthly charts to assess the broader market cycle and secular trends. Furthermore, comparing the FTSE chart to other global indices can provide insights into relative performance and intermarket relationships, offering a wider perspective on market dynamics. The visual nature of these charts makes complex data more accessible and understandable.
1 note
·
View note
Text
Latest Java Charting Libraries are listed in this page Java offers immense flexibilities in running a number of web applications independent of the running platform and computer architecture. The two and three-dimensional representations through different types of bar graphs provided by Java have enhanced its popularity since its release. In recent years, Java libraries are being used less for web-based reporting since there are really powerful jQuery and JavaScript charting libraries available for client-side rendering. However, even now Java software is still run on millions of computers as the Java Charting Library offers varied interesting features to the users and web developers. The users can embed stunning 2D and 3D representations in the web through different types of graphs and charts imported from the Java charting library. JFreeChart This open source Java charting library offers users the maximum alternatives to represent their complex data in a simplified manner. It enables the extensive use of X-Y charts, Pie charts, Bar graphs, Gantt charts, Pareto charts, combination charts, wafer map charts and other special types of charts. In a nutshell, JFreeChart is a comprehensive charting package providing maximum charting options to the users. Axis, legends, and scales are automatically drawn and, the user can also place various markers on the plotted chart. The charts can be zoomed for a better view and can be regularly updated by the attendants of the Java charting library. The user can download the developer’s guide and follow the applications accordingly. JCC Kit This is another promising Java Charting library next to the JFree Chart. This charting library occupies very little disk space about less than 100kb and is very useful for designing charts based on scientific data. The flexibility of JCC Kit enables easy writing of applet programs that presents data on the web page without any prior knowledge of Java programming language. Automatic rescaling, creating legends and up gradation is possible with JCC Kit Charting library. OpenChart2 This Java charting is very useful and simplifies the interface for plotting 2-D charts. Following the basics of JOpenChart library, OpenChart2 offers a variety of charting features including advanced forms of bar graphs, pie charts and scatter plots. jCharts This open-source charting facility is very useful to display different types of charts through JSP’s, Servlet and Swing apps. The developer can download any Servlet container and follow the examples of jCharts. GRAL Graphing Library This Java Graphing Library enables high-quality plotting and charting. It can also import data from texts, audios, and videos and the plots can be produced in JPEG, EPS, PDF, PNG and SVG files. Users can also use GRAL for different types of data processing and this library also provides a Java Swing interface. charts4j This lightweight charts and graphs Java API enables to create charts programmatically using Google chart tools. It can be integrated into any web application or Swing, JSP, Servlet or GWT. JChart2D This charting library is meant for representing engineering data demanding high precision than colorful presentations. JChart2D, a Java component displays dynamic 2D charts offering automatic labeling scaling. Users carrying basic knowledge of Java Swing and AWT can use it to the best possible limit. It is preferred over JFreeChart due to its dynamic feature. JFreeReport This is another open source tool meant for generating reports or it can be assigned as Java Report Generator. It provides an on-screen print preview based on data via Java Swing’s Table Model Interface, and reports can either be generated from the printer or can be exported to various formats like PDF, XLS, HTML and many more. Jzy3D In designing simple three-dimensional charts like bar graphs and scatter plots, Jzy3D graphing library is very handy. This charting library is also useful in creating 2D graphs and plots.
There are also provisions to add color maps and different contours beside 3D charts. Jzy3D also enables a wide range of customization through various layout tools. JasperReports This useful open source Java reporting tool helps in delivering rich content on the screen or exporting to HTML, PDF, XML, XLS and CSV files and printer. This 100% Java-based program finds extensive use in various Web and Java applications (JEE) that produce dynamic content. The user can generate reports instantly in the most simplified manner and get them printed. Different types of projects and jobs need different projections and representations, and Java charting library offers a number of charting tools to represent their data in an understandable manner. All of these charting applications are open source software and can be downloaded for free. Hope you found this list useful. What java libraries do you use for creating reports and charts? Article Updates Article Updated on Jan 2025 - link to latest post. Article Updated on September 2021. Some HTTP links are updated to HTTPS. Updated broken links with latest URLs. Some minor text updates done. Content validated and updated for relevance in 2021. Updated on April 2019: Minor changes and updates to the introduction section, images are HTTPS now.
0 notes
Text
Enhancing Data Presentation: The Importance of Attractive Charts in PowerPoint
Data Visualization: Common Queries Answered
1.How to make PowerPoint charts look good?
To enhance PowerPoint charts, follow these tips: choose a clean, professional design and consistent color scheme that aligns with your branding. Limit the number of data points to avoid clutter and use clear labels and legends. Opt for simple chart types like bar or line charts for clarity. Incorporate white space to improve readability and focus. Use contrasting colors for important data points to draw attention. Lastly, ensure your charts are properly sized and placed within the slide for a balanced layout. Always preview your slides to check for visual appeal and effectiveness.
2. How to do a histogram chart in PowerPoint?
To create a histogram in PowerPoint, follow these steps:
1. Open PowerPoint and insert a new slide.
2. Go to the "Insert" tab and click on "Chart."
3. In the Chart dialog, select "Histogram" from the list of chart types.
4. Click "OK" to insert the chart.
5. A spreadsheet will open; enter your data in the provided cells.
6. Adjust the axis titles and chart design as needed using the Chart Tools.
7. Close the spreadsheet, and your histogram will be displayed on the slide.
You can further customize it using formatting options.
3. How to create a box and whisker chart in PowerPoint?
To create a box and whisker chart in PowerPoint, first, open a new slide and choose "Insert" > "Chart." Select "Box and Whisker" from the chart options. Click "OK," and an Excel sheet will open for data input. Enter your data in the provided cells, then close the Excel window. The chart will update automatically. You can customize the chart's design and layout by selecting it and using the "Chart Tools" on the ribbon. Adjust colors, labels, and other elements as needed for clarity and presentation.
4. How do I make a box chart in PowerPoint?
To create a box chart in PowerPoint, follow these steps:
1. Open PowerPoint and insert a new slide.
2. Click on the "Insert" tab, then select "Chart."
3. In the Chart dialog, choose "Box and Whisker" from the list.
4. Click "OK" to insert the chart.
5. PowerPoint will open Excel for you to enter your data. Input your data in the provided spreadsheet.
6. Close Excel to view the updated box chart in PowerPoint.
7. Customize the chart's design and format using the Chart Tools that appear on the ribbon.
5. How do you create a waterfall chart in PowerPoint?
To create a waterfall chart in PowerPoint, first, you need to insert a chart. Go to the "Insert" tab, click on "Chart," and select "Waterfall" from the list. Input your data in the Excel sheet that appears, organizing it to reflect the sequential changes (positive and negative values). After entering data, customize the chart with titles, labels, and colors by using the Chart Tools available. Adjust the chart layout as needed, then finalize your presentation by adding any additional design elements. Save your work to keep your changes.
Visit: VS Website See: VS Portfolio
0 notes
Text
What Is Data Visualization?

Today’s world is data driven. Governments and organizations collect trillions of data points every year with the aim of better understanding populations and informing service delivery. Much of this data is collected and presented as rows and columns of numbers which are hard to interpret. Data visualization changes that.
Data visualization involves presenting quantitative information in visual format. It involves using charts, maps, graphs, and other visual tools to relay data in a simpler, visual format. It is founded on the fact that humans are visual creatures, hence comprehend data more readily when it is presented to them in a visual format. Visualization enables them to identify trends easily, spot correlations between data sets, and contextualize data by time or geography.
There are various types of data visualizations. The most common are charts, graphs, and maps. Charts present a single subset of data such as revenue, profit, or customer registrations. They include bar charts where the data is presented as bars, line charts where it is presented as lines, or pie charts where it is presented as pie-shaped segments of a circle.
Graphs present data in a tabular format with one variable along the x axis and another along the y axis. They allow complex data visualization, enabling viewers to compare relationships between two or more subsets of data. For example, a graph can show both revenue and profit over a number of years so viewers can analyze the relationship between the two over time.
Maps are a form of geospatial visualization. They are used to depict data over a map, say of a country, state, or region. For example, a state map can include circles showing distinct values such as vaccination rates or the number of registered voters in each county.
The above are the major formats of data visualization. Other formats include dashboards, tree maps, heat maps, box plots, network graphs, and 3D surface plots.
Virtually all government agencies, nonprofits, academic institutions, and companies that collect or interpret data can use data visualization. Companies can, for example, use it to present data on sales, customer trends, financial outlays, or employee performance. Academic institutions can use it to present data on student enrollment, class attendance, and students’ performance in different courses.
There are several reasons why organizations should use data visualization. The first one is better comprehension of internal and external data. Another benefit is that it takes far less time to interpret visualized data compared to numerical data presented in rows and columns.
This leads to more informed discussions during meetings and higher quality decision making. Because they understand their data deeply, executives and managers can set clearer goals, formulate better operational procedures and controls, and develop more effective marketing plans.
Another reason to use data visualization is risk mitigation. Data visualization tools like charts and graphs make it possible for managers to monitor trends like employee performance, compliance, and customer satisfaction. They can analyze performance over time, identify lags in performance early, and take measures to address them before they worsen. This is much harder to do with numerical data.
There are, however, some disadvantages to data visualization. The first is that it takes time to prepare data visualizations. While digital tools do make it easier, the process still requires sorting through troves of data, identifying relevant inputs, and correctly presenting them in graphs, charts, and maps. This may be time-consuming.
Another disadvantage is confusion if the charts and graphs are poorly designed or include inappropriate information. People who are visually impaired may also find visualized data illegible. Ultimately, though, the advantages of data visualization far outweigh the disadvantages.
0 notes
Text

From Data to Action: Visualizing Your Fitness Journey with Advanced Data Visualizations
In today’s fitness landscape, simply collecting health and performance data isn’t enough; making sense of that data is key. This is where Aether X advanced data visualization steps in, transforming numbers into actionable insights through dynamic, interactive visuals that reveal the hidden relationships between various health metrics. Leveraging Aether x advanced data visualization can empower you to see the bigger picture of your fitness journey, making it easier to reach your health and fitness goals.
Why Advanced Data Visualization Matters in Fitness
Aether X Advanced data visualization helps break down complex health data, giving users more than just static numbers or charts. It offers real-time, interactive, and multi-dimensional visuals that reveal the connections between different fitness metrics. For example, instead of just viewing your daily step count or calorie intake, advanced visualization tools can display how these figures interact over time and how they affect other metrics, like VO2 Max or sleep quality.
This level of analysis is particularly important as it enables users to spot patterns and make data-driven decisions to adjust their workouts, lifestyle, and nutrition. By understanding these patterns, you can focus on what’s working and quickly adapt to what isn’t, helping you to stay on track toward achieving your goals.
Key Visualizations in Fitness Tracking
Correlational Scatter Plots for Fitness Metrics Scatter plots are one of the best ways to observe correlations between variables. By using advanced scatter plots, you can identify relationships between your VO2 Max and BMI, for instance. Each data point represents an instance of VO2 Max measurement plotted against BMI, helping you see if lower BMI tends to correlate with improved cardiovascular health, or if other factors might be influencing these outcomes.
Multiline Graphs for Comparing Trends Over Time A multiline graph allows you to track several fitness metrics over the same time frame, making it easy to compare relationships. For example, you can overlay lines representing heart rate, calories burned, and activity time.Aether X Advanced data visualization makes it easy to highlight peaks and dips in each metric, helping you understand how changes in one metric affect others and how they all contribute to your overall fitness trend.
Heat Maps for Daily and Weekly Patterns Heat maps are ideal for visualizing data like workout frequency, sleep duration, and stress levels. Each square in the heat map can represent a day or week, colored according to the intensity of the activity or measurement. You’ll quickly see which days or times your stress levels peak or when your activity levels are highest. By understanding these patterns, you can adjust your routine to improve your physical and mental well-being.
Stacked Bar Graphs for Performance Breakdown Stacked bar graphs show a breakdown of various fitness metrics within a single chart. This format is particularly useful for comparing your cardio, strength, and flexibility training over a week. The bars indicate the volume or intensity of each type of exercise, making it easy to see whether you’re maintaining a balanced workout routine.
Radar Charts for Comprehensive Fitness Overview Radar charts, also known as spider graphs, give you a well-rounded view of your fitness profile. Each axis represents a different metric, such as VO2 Max, BMI, SpO2, and heart rate variability. Your performance in each area is plotted along the axis, creating a shape that reveals your strengths and areas for improvement. This visual is invaluable for users who want a holistic snapshot of their fitness progress.
Trend Lines for Predictive Analytics Aether X Advanced data visualization often incorporates trend lines for predictive analysis, especially valuable in fitness tracking. For instance, using past data, a trend line can project future VO2 Max improvements based on current progress. These predictive insights can help users set realistic goals and adjust their training to stay on the trajectory.
Benefits of Advanced Data Visualization in Fitness
Aether X Advanced data visualization transforms raw health data into powerful, easy-to-digest visuals that drive action. Here’s how it benefits users:
Enhanced Motivation: Interactive, colorful visuals give users clear markers of progress, making goals feel more attainable.
Better Decision-Making: By understanding how metrics like heart rate and sleep quality relate, users can make informed changes in their routines.
Personalization: Seeing how different aspects of your fitness journey interrelate allows you to customize your workouts and lifestyle adjustments based on real insights.
Actionable Insights: With predictive trend lines and multi-metric comparisons, advanced visualization tools offer concrete steps to improve fitness outcomes.
Using Advanced Data Visualization for Real Results
For anyone serious about fitness, understanding the connections between metrics is crucial. Aether X Advanced data visualization tools bring clarity, enabling users to see the impact of sleep on performance or the correlation between calories burned and VO2 Max over time. This level of insight takes fitness tracking from passive monitoring to active, informed decision-making.
In the world of fitness, knowledge truly is power. With advanced data visualization, you’re not just collecting data; you’re turning it into a powerful tool for personal growth and well-being.
Conclusion
WithAether X advanced data visualization, fitness enthusiasts have a new way to interact with their health data. This approach highlights connections that might otherwise go unnoticed, empowering users to make smarter, more informed decisions about their fitness journey. So next time you look at your smartwatch or fitness app, remember: it’s more than just numbers—it’s a road map to your healthiest self.
Hashtags:
#poweredbytiktik#tiktikai#aetherx#healthtech#tiktikglobal#smartwearables#asktiktik#techinnovation#wearabletech#AdvancedDataVisualization#FitnessTracking#DataToAction#SmartWellness#HealthInsights#FitnessJourney
0 notes
Text
HighCharts API And Looker Chart Config Editor Tips & tricks

Make your data story more comprehensive by using personalized Looker charts and visualizations with HighCharts API.
Looker Chart Config Editor Tips And tricks
A collection of numbers is all that data is unless it can be used to tell a story and obtain further information. Google Cloud is always working to enhance Looker’s features so you can work together with reliable metrics and share your data stories. It has added the capability to add bullet chart, sunburst, venn, and treemap visualizations to Looker Explores and dashboards by utilizing the Chart Config Editor to previously available Looker visualizations. It wanted to offer some best practices on how to use the Chart Config Editor to enrich your visualizations and make meaningful data experiences so that you can make the most of these new Looker visuals.
HighCharts API
For those who are unfamiliar with the Chart Config Editor, Looker visualizations show your data using the Highcharts interactive charting library. You may customize your visualizations by utilizing the editor, which exposes portions of the Highcharts library API. In order to enhance your visualizations, it will explore the Highcharts API and discover some useful Chart Config Editor tips and tricks in this post. You need have access to Chart Config Editor and be familiar with the JSON format in order to fully comprehend its examples in order to get the most out of this post.
HighCharts API reference
In a line chart, set the labels and look of each line
Consider a representation of a line chart that shows several time series, each represented by a single line. You might find it difficult to distinguish between the lines in the dashboard viewer, or you might want to highlight a certain line more than others. Highchart offers several `series} properties that you can use to modify how each line is presented and styled. Among the qualities are:
{dashStyle} to alter the pattern of each line
To alter the thickness of every line, use {lineWidth}.
{opacity} to alter the opacity of each line
Use dataLabels to add labels to the values or data on a line.
You can apply each {series} property in any combination to make the data in your line visualization easier for your stakeholders to grasp.
By setting the default styling across all lines using Highchart’s plotOptions attribute, you can further simplify the settings shown in the above sample. Afterwards, you may use the {series} element, which changes the default styling, to further modify individual lines. The following Chart Config Editor setting sample shows both the overriding and default styling:
Allowing visuals to scroll inline
Imagine a column chart visualization where each column represents a month and the date time x-axis spans several decades. The width of your dashboard limits the visualization you may use, so as time goes on, the widths of each column get smaller and the monthly or annual trends are compressed, making them difficult to grasp.
To enable horizontal scrolling for your stakeholders through a column or line-chart visualization, try defining the width of your visualization using Highchart’s chart.scrollablePlotArea} attribute. TheminWidthattribute allows you to establish the minimum width of your visualization, while thescrollPositionX` attribute allows you to specify the visualization’s starting scrolling position. The visualization’s minimum width of 2,000 pixels and its initial scrolling position to the right are established in the Chart Config Editor configuration sample below.
chart: { scrollablePlotArea: { minWidth: 2000, scrollPositionX: 1 } },
Try experimenting with the scrollPositionY} andminHeight` attributes as well to allow scrolling vertically in your visualizations.
Complete control over the data labels for additional chart visualizations, such as pie charts
You can name each pie slice using the plot menu options in a pie chart visualization, but usually you can just display the slice’s value or percentage. To fully comprehend all of the data, the observer must perform a double take, glancing between the legend and the data labels. Additionally, all of the data will not be accessible in a scheduled PDF delivery of the dashboard containing the visualization, even if users might mouseover each pie slice to view it.
To help your stakeholders quickly extract information from your charts, you can use the Chart Config Editor to display any information that is available on the HighCharts PointLabelObject on the data labels. This includes the percentage and value displayed simultaneously. You can also further customize the labels with HTML. To modify the format and style of a chart’s data labels, you must set up the previously stated Highchart {dataLabels} attribute from its first example. The following {dataLabels` attributes need to be configured:
{enabled}, as demonstrated in our first example, to enable data labels on the chart
To enable HTML styling of data labels, use useHTML.
To apply CSS styles to every data label, use {style}.
Use {format} to specify the piece and format.
The data labels of the pie chart are shown in the Chart Config Editor configuration sample below with a font size of 12 pixels. If the property name for the format} attribute is enclosed in curly braces, then all of the PointLabelObject's properties can be shown in the data label. The example assigns the following string to theformat` attribute}:
The pie slice name bolded with the key attribute of the PointLabelObject within an HTML Draw Focus On This Aspect
The value of the data point with the `y} property of the PointLabelObject
Specifies the percentage of the data point with one decimal place formatting using the PointLabelObject’s percentage property
The format of the final data label is as follows: Category: 11.5%, 596524.
Keep in mind that the tooltip.format} attribute and thedataLabels.format} attribute function similarly; the documentation has more information on this. Also take note that for pie charts, it need the plotOptions.pie.dataLabels} attribute. You must override theplotOptions.line.dataLabelsattribute if you wish to format a line chart with the same data-label style. The interface and functionality of many chart kinds are mostly shared via thedataLabels` element.
Make your charts more insightful and powerful
We hope that these illustrations will work as a springboard for you as you investigate the HighCharts API and discover how to set up your Looker visualizations to convey useful and compelling narratives. You now know how to enable inline scrolling of visualizations, edit data labels, and change the appearance of each series of your data using the Looker Chart Config Editor and HighCharts API.
Read more on govindhtech.com
#HighChartsAPI#LookerChartConfig#EditorTips#GoogleCloud#dashboard#Lookervisualizations#Makeyourcharts#chartvisualizations#datalabels#tricks#api#technology#technews#news#govindhtech
0 notes
Text
How to Use the Kalyan Chart to Predict Game Outcomes?
In the world of gambling and gaming, enthusiasts are constantly seeking ways to gain an edge, whether it's in casinos, sports betting, or other games of chance. One such tool that has gained popularity among players is the chart game.
Originating from the world of Satta Matka, a form of lottery-style gambling popular in India, the best kalyan chart has found applications beyond its traditional use. In this blog, let's explore what the chart game depicts and how it can be used to predict game outcomes effectively.
Understanding the Chart
Before delving into its predictive capabilities, let's first understand what the chart is. Essentially, the chart is a graphical representation of past results in a particular game or betting scenario. It displays historical data in a structured format, typically with dates or rounds on one axis and corresponding outcomes or numbers on the other.
Using the chart or Predictions
Now, the question arises: how can this historical data help predict future outcomes? While the chart doesn't offer fool proof predictions, it provides valuable insights into patterns and trends that can inform decision-making.

Here's how you can use it effectively
Analyze Patterns: By studying the patterns within the kalyan chart, such as recurring numbers or sequences, you can identify trends that may indicate potential future outcomes. Look for clusters, repetitions, or anomalies that could influence your predictions.
Consider Probabilities: While past performance doesn't guarantee future results, understanding the probabilities associated with different outcomes can guide your predictions. The chart game allows you to assess the frequency of specific numbers or combinations, helping you make more informed decisions.
Combine with Other Strategies: The game is just one tool in your predictive arsenal. To enhance accuracy, consider combining its insights with other analytical techniques, such as statistical models, expert opinions, or situational factors relevant to the game or betting scenario.
Stay Updated: Continuously updating and analyzing the chart is essential for refining your predictions over time. As new data becomes available, adjust your strategies accordingly and adapt to changing trends in the game or betting environment.
Case Study
Applying the numbers in sports betting. Let's illustrate the application of the chart game with a hypothetical example in sports betting. Suppose you're wagering on football matches, and you've been maintaining a chart of past game outcomes for various teams.
By analyzing the chart, you notice a pattern where certain teams tend to perform better or worse under specific conditions, such as playing at home or away, facing particular opponents, or during certain phases of the season. Armed with this insight, you adjust your betting strategy accordingly, placing more favorable bets based on the historical data.
Final Words
While predicting game outcomes with absolute certainty remains elusive, tools like the kalyan chart offer valuable insights that can significantly improve your chances of success in gambling and gaming.
By leveraging historical data, analyzing patterns, and staying informed, you can make more informed decisions and increase your odds of winning over time. Just remember to exercise caution, manage your risks responsibly, and view predictions as informed guesses rather than guarantees.
0 notes
Text
How to master data visualization: 8 intriguing best practices
Data visualization plays a crucial role in the analysis and interpretation of data by transforming raw information into meaningful insights. By visually representing complex data sets, charts, graphs, and interactive visualizations make it easier for individuals and organizations to understand information, identify patterns, and make informed decisions. Importance of Data Visualization Data visualization is important because it allows us to comprehend and communicate data in a more intuitive and impactful way. It takes advantage of the human brain's visual processing power, enabling us to absorb and process information more efficiently than through text or numbers alone. Visualizing data helps identify trends, outliers, and relationships, leading to a deeper understanding of the underlying patterns within the data. https://rahularaj.com/10-essential-python-libraries-every-data-scientist-must-know/ Benefits of Effective Visualization for Decision-Making and Insights - Clarity and Simplification: Visualizations simplify complex data by presenting it in a visually appealing and digestible format. They enable users to quickly grasp the main findings and draw insights from the information at hand. - Identification of Patterns and Trends: By representing data visually, patterns, trends, and correlations become more apparent. This allows decision-makers to identify opportunities, risks, and potential issues that may have been difficult to detect in raw data. - Enhanced Communication and Persuasion: Visualizations are an effective means of communicating data-driven insights to various stakeholders. They can help break down complex concepts and findings, making it easier for non-technical audiences to understand and appreciate the significance of the data. - Interactive Exploration: Interactive visualizations permit users to manipulate and explore data, enabling them to dive deeper into specific data subsets or variables. This interactivity facilitates a more interactive and dynamic analysis experience, encouraging users to ask questions and discover new insights. - Data-Driven Decision-Making: Effective data visualizations empower decision-makers to base their judgments on sound evidence and insights derived from data. By ensuring data-driven decision-making, organizations can minimize risks, optimize resource allocation, and make informed strategic choices. In conclusion, data visualization is a powerful tool that enables us to unlock the true potential of data. By transforming complex information into visual representations, data visualization simplifies understanding, enhances decision-making, and uncovers valuable insights that drive innovation and progress.
Choosing the Right Visualization Technique
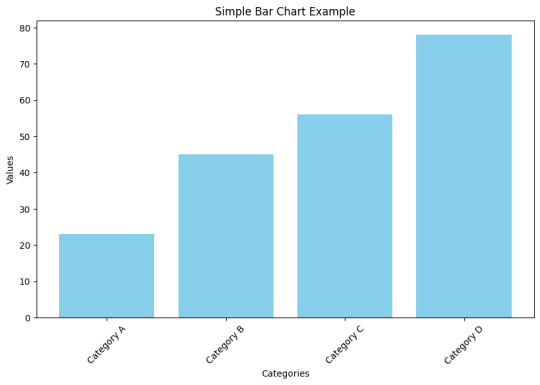
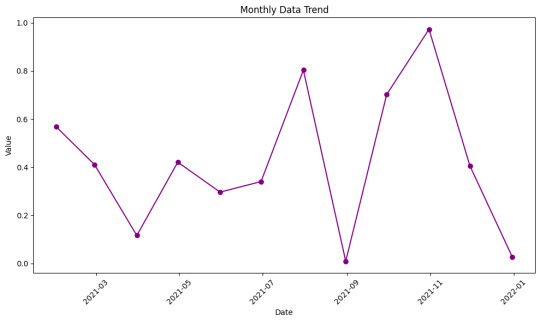
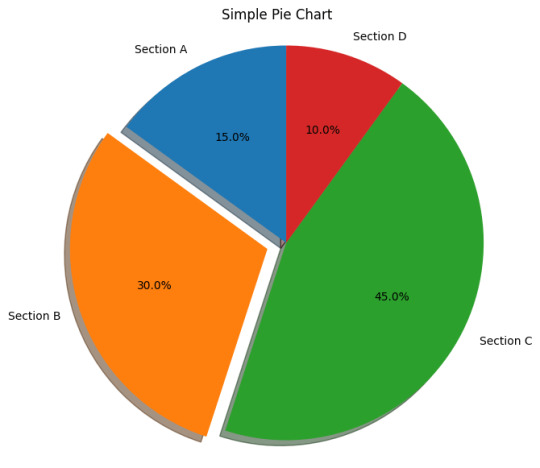
When presenting data effectively, choosing the right visualization technique is crucial. Different types of visualizations are suitable for specific purposes, allowing you to convey information clearly and facilitate better data understanding. Here are five common visualization techniques and their respective applications: - Bar charts and column charts: These charts are ideal for displaying comparisons and trends. They use rectangular bars or columns to represent data values, making it easy to compare different categories or variables. Bar charts are preferable when the categories are distinct, whereas column charts are more suitable when the data points have varying heights. - Line charts and area charts: These visualizations are effective for showing changes over time. Line charts display data as a series of data points connected by lines, revealing trends and patterns. Area charts, on the other hand, fill the space between the lines and the x-axis, making it easier to see the magnitude and distribution of values over time. - Scatter plots and bubble charts: These types of visualizations are useful for exploring relationships and correlations in data. Scatter plots represent individual data points using dots, plotting them along two axes to showcase correlations between variables. Bubble charts take it a step further by incorporating additional information through varying sizes or colors of bubbles, allowing for visual representation of three dimensions. - Pie charts and donut charts: These circular visualizations are effective for illustrating proportions and percentages. Pie charts divide a circle into slices, with each slice representing a different category or value. The size of each slice corresponds to the proportion it represents. Donut charts are similar but include a hole in the center, providing space for additional information or emphasizing the central theme. - Heatmaps and treemaps: Heatmaps are ideal for visualizing complex data patterns. They use color gradients to represent data values and provide a visual summary of a large dataset. Treemaps, on the other hand, use rectangles nested within larger rectangles to display hierarchical data. The size and color of each rectangle represent different variables, making it easy to identify patterns and relationships within the data.
By carefully selecting the appropriate visualization technique based on the nature of your data and the insights you want to convey, you can effectively communicate your data findings to your audience. Remember that clarity, simplicity, and relevance are key when choosing visualizations.
Designing Effective Visuals
When creating visuals, it is crucial to ensure that they effectively convey the intended message and engage the audience. Here are some key strategies to design visuals that are impactful and visually appealing: - Simplify and Declutter: To emphasize the key message and minimize distractions, simplify the visual elements. Remove any unnecessary clutter and focus on highlighting the essential information. Use concise text, clean lines, and minimalistic design to create a clear and uncluttered visual. - Choose Appropriate Colors: Colors play a significant role in visuals as they enhance readability and convey meaning. Select colors that align with the message and the overall tone of the content. Use a limited color palette to maintain consistency and avoid overwhelming the viewer. Consider the psychological impact of different colors and their associations when choosing appropriate colors for your visuals. - Use Proper Scaling: Proper scaling is crucial for accurately representing data values and proportions. Ensure that the size of each visual element, such as bars in a bar chart or icons in an infographic, accurately reflects their respective values. Avoid distorting proportions as it can mislead the audience and impact the understanding of the information presented. - Incorporate Meaningful Labels: Labels provide context and explanations for the visual elements. Include clear and concise labels that help the audience understand the information being presented. Use labels to identify data points, add captions, or provide additional context. Ensure that the labels are easily readable and positioned appropriately within the visual. - Utilize White Space: White space refers to the empty or blank areas in a visual. It is essential for creating visual balance and aiding comprehension. Incorporate sufficient white space between different elements to prevent visual clutter and enhance readability. White space also helps guide the viewer's attention to the most important parts of the visual. By following these strategies, you can design visuals that effectively communicate your message, engage the audience, and improve overall comprehension. Remember to maintain a cohesive visual style throughout your content for a polished and professional look.
Making Data Interactive
To make data more engaging and enhance exploration, adding interactivity is key. By incorporating interactive elements, users can have a more immersive and effective experience while analyzing and interpreting data. 1. Enhancing User Engagement: Adding interactivity to data visualizations, such as charts and graphs, encourages users to actively engage with the information presented. This can be achieved through various methods, including: - Tooltips: Tooltips provide additional contextual information when users hover over data points or elements. They can be used to display specific values, explanations, or relevant details, allowing users to gain a deeper understanding of the data. - Filters: Interactive filters enable users to refine the displayed data based on specific criteria. Users can selectively include or exclude certain categories, time periods, or other variables, allowing for a more focused analysis. - Drill-Down: Implementing drill-down features allows users to explore data at different levels of granularity. By clicking on specific elements, users can dive deeper into the data, revealing more detailed information and uncovering insights that may not be apparent at a high-level view. 2. Improving Data Exploration: Interactive data visualization techniques facilitate effective exploration and analysis. Some strategies to consider include: - Hover Effects: Incorporating hover effects, such as highlighting or enlarging data points, gives users immediate visual feedback and enables them to quickly identify patterns or outliers. - Interactive Maps: Maps that allow users to interact with geographical data through zooming, panning, and clicking on specific regions can be highly effective in presenting location-based information. - Animated Transitions: Smooth animations when transitioning between different data views or visual representations can help users better perceive changes and detect trends. 3. Promoting Data Understanding: Interactive features can contribute to users' comprehension of complex datasets. Examples of how this can be achieved include: - Comparative Analysis: Interactive elements that facilitate side-by-side comparisons enable users to contrast different datasets or subsets of data. This can be done through interactive sliders, checkboxes, or other controls. - Linked Visualizations: Creating connections between multiple visualizations allows users to explore relationships and correlations between variables. For example, selecting a data point in one visualization could highlight related data points in other linked visualizations. - Storytelling: Combining interactive elements with narrative storytelling techniques can guide users through a data-driven story, making the information more understandable, engaging, and memorable. In conclusion, by adding interactivity to data, such as tooltips, filters, and drill-down features, users can have a more immersive and exploratory experience. Furthermore, engaging users with interactive data visualizations helps improve data understanding, promotes valuable insights, and enhances the overall data analysis process.
Telling a Compelling Story with Data
To effectively communicate information through data visualizations, it is crucial to construct a compelling narrative that engages viewers and conveys a clear message. Here are three key steps to follow: 1. Establishing a Clear Narrative Begin by defining the problem or topic that your visualization aims to address. Clearly articulate the purpose of the visualization, whether it is to inform, persuade, or entertain. This narrative framework will serve as the foundation for your data story. For example, if your visualization focuses on the impact of climate change on global temperatures, start by explaining the significance of this issue and why it is important to understand its implications. This context will help viewers grasp the relevance of the data presented. 2. Guiding the Viewer's Attention Once you have established your narrative, guide the viewer's attention towards the key insights and findings within the data. Use visual cues such as color, size, or position to emphasize the most important elements. By directing attention to these key points, you can ensure that viewers understand the main takeaways of your visualization. Additionally, provide contextual information to help viewers interpret the data correctly. This could include labeling axes, providing units of measurement, or offering comparisons to familiar benchmarks. These annotations will enhance the viewer's understanding and facilitate meaningful insights. For instance, if your visualization compares the energy consumption of different countries over time, highlight the countries with the highest and lowest energy usage. Provide explanations or annotations to clarify any fluctuations or patterns observed in the data, allowing viewers to fully comprehend the implications. 3. Incorporating Annotations and Explanations To further augment the narrative, consider adding textual cues and explanations throughout the visualization. Annotations can provide additional context or clarify complex concepts. Use headlines, subheadings, labels, and captions strategically to provide clear and concise information. For example, if your visualization illustrates the impact of a marketing campaign on sales, include annotations that describe the campaign objectives, targeted audience, and any external factors that influenced the results. These annotations will help viewers understand the story behind the data and connect it to real-world scenarios. Remember to keep the text concise and focused, avoiding excessive clutter that may distract from the main narrative. Use a combination of heading levels, paragraphs, and bullet points to structure the content and create visual hierarchy. By following these steps and incorporating effective annotations, you can transform raw data into a compelling story that engages and informs viewers, allowing them to derive meaningful insights from the visualization.
Ensuring Accessibility and Responsiveness
In order to create an inclusive and user-friendly experience, it is important to prioritize accessibility and responsiveness when designing visualizations. This ensures that all users, including those with disabilities, can effectively engage with the content. Furthermore, optimizing for different devices and screen sizes allows for seamless interaction across various platforms. Designing Accessible Visualizations: - Color Contrast: Ensure that there is sufficient contrast between the text and background colors in the visualization to make it easy to read for individuals with visual impairments. - Alternative Text: Provide descriptive alternative text for images and graphics within the visualization. This allows users with visual impairments to understand the content through screen readers. - Keyboard Accessibility: Design the visualization in a way that users can navigate and interact with it solely using a keyboard, without requiring a mouse or touch input. This accommodates individuals with motor disabilities who may have difficulty using a traditional pointing device. - Assistive Technologies: Test the visualization with assistive technologies, such as screen readers and voice recognition software, to ensure compatibility and proper interpretation of the information. Optimizing for Different Devices and Screen Sizes: - Responsive Design: Employ responsive design techniques to ensure that the visualization adapts and scales appropriately across different screen sizes, from mobile devices to desktops. This allows users to easily view and interact with the content regardless of the device they are using. - Flexible Layouts: Use flexible layouts and grids that automatically adjust and reflow based on the available screen space. This ensures that the visualization remains visually appealing and user-friendly on different devices. - Mobile Optimization: Consider the limitations of mobile devices, such as smaller screens and slower internet connections. Optimize the visualization by minimizing unnecessary elements, optimizing image sizes, and prioritizing essential content for a smoother mobile experience. - Touch-Friendly Interactions: Implement touch-friendly interactions, such as swipe gestures and pinch-to-zoom, to accommodate users accessing the visualization on touchscreen devices. By prioritizing accessibility and responsiveness in visualization design, you can ensure that your content is widely accessible and provides an enhanced user experience for all users, regardless of their abilities or the devices they are using. This commitment to inclusivity and usability fosters a positive and inclusive digital environment.
Utilizing Advanced Visualization Techniques
Advanced visualization techniques play a crucial role in effectively presenting complex data and insights. By leveraging these techniques, you can enhance comprehension and make data-driven decisions. Let's delve into some of the prominent methods: - Network Diagrams and Sankey Diagrams: These visualizations are ideal for presenting connected data and flows. Network diagrams display relationships between entities, such as social networks or organizational structures. On the other hand, Sankey diagrams demonstrate the flow of quantities or values through a system. Both diagrams enable users to identify patterns, bottlenecks, and interactions within complex systems. - Geographic Maps and Choropleth Maps: When spatial patterns and distributions need to be visualized, geographic maps and choropleth maps are valuable tools. Geographic maps display data on a geographical layout, providing insights into regional variations. Choropleth maps, on the other hand, use color-coding to represent data at a specific geographic level, such as countries or regions. These visualizations help understand spatial relationships, identify trends, and make location-based decisions. - Tree Diagrams and Sunburst Charts: Visualizing hierarchical relationships is made easier with tree diagrams and sunburst charts. Tree diagrams display hierarchical structures, with parent nodes branching out into child nodes. They are widely used to represent organizational hierarchies or categorize data. Sunburst charts, on the other hand, show hierarchical data in a circular layout. They illustrate the proportion of each category within the hierarchy, helping users understand the distribution of data. By incorporating these advanced visualization techniques into your data analysis and communication, you can effectively convey complex information, identify patterns, and make data-driven decisions. These visualizations enhance understanding and simplify the interpretation of complex data structures, resulting in more impactful insights.
Testing and Iterating
Testing visuals is crucial for ensuring the usability and effectiveness of designs. Read the full article
0 notes
Text
Data Visualization: Charting the Best Practices

Introduction
Data visualization is a powerful way to communicate complex ideas and data points quickly and effectively. With the right visualization, you can explore trends, compare relative values, and make better decisions. In this comprehensive guide, we’ll discuss the best practices for data visualization, from choosing the right charts to using design principles to make your data stand out.
A Comprehensive Guide to Data Visualization
Data collection is only useful if you are able to present the data and draw conclusions from it. That’s where data visualization comes in. Visualizing your data will help you break down large chunks of information, synthesize complex relationships, and bring to life the stories your data is telling you. The key to effective data visualization is understanding the various types of charts and how to implement them. But first you need to understand the different types of data points you’ll be visualizing. There are 3 main types of data: categorical (x-axis), numerical (y-axis), and qualitative (z-axis). With these different types of data, there are various approaches to visualizing them, from simple scatter plots to complex 3D renderings. Depending on what type of data you’re working with, you can choose from different types of charts, like line charts, bar charts, or pie charts.
Unlocking the Power of Charting Best Practices
Even if you are working with the best possible chart type for your data, there are still ways to improve the visualization, and get more from your data. Here are the top charting best practices to unlock the power of your data: Choose the Right Chart Before you create any charts or graphs, ask yourself, “What type of chart will best depict my data in a meaningful way?” Take the time to consider all the possible chart types and their strengths and weaknesses. Minimize Visual Noise Visual noise, like unnecessary colors and fonts, are distracting and can drown out the actual information. Stick to a few distinct colors and a clean design, and make sure any extra elements or annotations are actually adding to the story. Use the Data Wisely The effect of a chart can be dulled by including extraneous data. Choose the data points that are most important and exclude the rest. Additionally, format the data to emphasize the critical elements and de-emphasize the less essential points.
Conclusion
Effective data visualization can help bring complex data points to life and uncover valuable insights. But there’s more to making breathtaking graphs and charts than simply grabbing a template and dropping in some data points. To really bring your data to life, be sure to follow these charting best practices. By properly selecting the right chart, minimizing visual noise, and using the right data points, you’ll get more out of your data and discover the hidden stories behind the numbers. Read the full article
0 notes
Text
Dugouts & Deathclaws??


This was pretty inevitable, wasn't it.
Individual images on my Twitter (tanaleth_tweets); alignment chart & analysis under the cut!
Disclaimer: YMMV on any of these interpretations. I tried to avoid repetition and the temptation to multiclass, which is why I limited the number of characters to the base game. (Strong fought Cait for the Barbarian slot and lost.)
I also stuck to core D&D 5E archetypes and backgrounds… except where I didn’t. Call it my Chaotic streak.
Acknowledgements: Hat tip to @bigbraincel for a lot of these ideas (like warlock Deacon). Thanks also to @theggning, @minuteminx, @third-rail-vip, and everyone else who's mulled this over with me on Discord.
Alignment chart
All the characters I drew, plus a few extras:
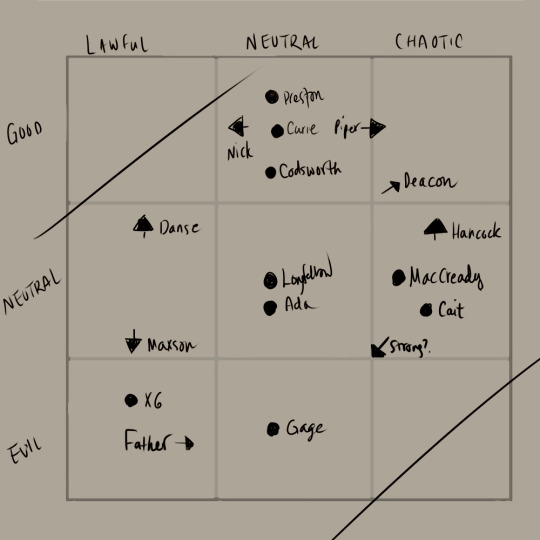
Why the little arrows: a lot of the characters’ arcs or core conflicts could be represented as a tension between squares on the alignment chart. Not all of the characters are comfortable in their alignments or even destined to remain static where I placed them.
Character breakdown
A couple more notes on alignment in general:
As I'm using it here, alignment is first and foremost a roleplaying tool that guides a character’s choices and actions. FO4 has a great cast of companions with really rich characterization—richer, I think, than fans sometimes give it credit for.
The lack of clear-cut LG and CE characters among the companions is notable and I think it reflects the writing's deliberate tilt to ambiguity and shades of gray. You could argue for CE among the raiders, etc., but the Fallout universe really isn't one that lends itself to LG characters. It’s very hard for a character to be both Good and Lawful in a world where institutions are all basically corrupt.
It's not entirely crapsack either, though; there’s reason for hope and there’s goodness and resilience among all the muck. Very few people or even factions are all good or all bad. (Except the Legion. All my homies hate the Legion.)
Once again: YMMV! Even where canon agrees on a character’s actions, you might interpret their motivations differently or weight the consequences differently. It’s all for fun. (Please don’t leave me nasty notes. That is not a Good action.)
Also, can I just say that formatting this kind of post for Tumblr is a pain in the butt. Tumblr is Chaotic Evil.
Lawful Evil - X6-88
Pretty much a textbook example of this alignment. X6 is driven by loyalty to authority in a way that many of the other Evil-aligned characters aren’t (e.g. Gage, who I’d put as comfortably Neutral Evil).
Equally driven by a desire for order, but less willing to commit atrocities for it is Danse.
Lawful Neutral - Danse
Danse aspires to be a Good guy—he tries really hard to be one—but when we meet him, we see him actively suppressing his own, more humane instincts in service of the ideals of the Brotherhood.
Here are some possible adjectives describing lawful neutral characters: reliable, responsible, truthful, orderly, loyal, respectful of authority, regular, structured, rigid, neat, methodical, and precise. (source)
Yep. That’s him.
Chaotic Neutral - Hancock, Cait, MacCready
Cait and Mac are solidly Chaotic Neutral. Cait is a little further south on the Good/Evil axis, but neither of them are bad people: their focus is on them and theirs. Survival first, everything else second. A very Neutral attitude.
This one is going to be controversial, since I think a lot of people read him as Chaotic Good, but I’d put Hancock over the border into Neutral too. I think his intentions are good, but he does a little too much stabby-stabby and overlooks a little too much gang violence to be Good; really, his character is all about the contradiction between his ideals and his (in)actions.
Actually, Danse and Hancock are good foils for each other. They're almost polar opposites on the law/chaos axis, but in terms of morality land at about the same place: both want to be good guys, but—at least when we meet them in FO4—neither of them are doing what they would need to to be Good guys.
But someone else is, and that's...
Chaotic Good - Deacon
Deacon was a really interesting character to ponder. I actually suspect his original or “natural” alignment is something closer to True Neutral… but he’s dragged himself into Chaotic Good by virtue of his actions and his desire to atone for past mistakes. (Looking at it in that light, when we meet him in FO4, he’s still “balancing out” that dip into Evil in his youth. Aiming for a lifetime average of Neutral??)
Neutral Good - Preston, Curie, Codsworth, Nick, Piper
The busiest square in the chart!
Within it, Nick and Piper lean Lawful and Chaotic respectively, but I’d argue that they both still fall within the bounds of Neutral Good. Piper opposes authority because it’s corrupt, not because she believes in fighting authority for its own sake; Nick supports order in general but also recognizes the potential for the abuse of power.
Codsworth might be a little lower on the Good/Evil axis than the others, I think (some of his commentary is hilariously/alarmingly violent) but overall, he’s pretty committed to being a good bot.
Preston and Curie are comfortably Neutral Good, in my reading. Both are very concerned with doing good and improving the world; both will defy an unjust law but also disapprove of unnecessary shenanigans.
And last but not least, on an alignment chart all his own:
Good Boy - Dogmeat
You know it's true. ૮ ・ﻌ・ა
#fallout 4#fallout#paladin danse#preston garvey#piper wright#nick valentine#hancock fo4#deacon fo4#cait fo4#john hancock#x6-88#rj maccready#curie fallout 4#codsworth#dogmeat#dungeons and dragons#my art#dnd#5e#dea draws danse#(and a bunch of other characters)
931 notes
·
View notes
Note
This is really random but how do you make that gender dysphoria-euphoria graph on excel? As a fellow grad student, I’m trying to get better at data visualization, and that is so pretty. I’m not really a big excel girlie (mostly use stata) but I’ve never seen that type of graph before so I wouldn’t know how to even look it up.
Haha sure!! So it's not too hard to make but it's kinda involved, and I'm sure there's easier ways to do it in python (which I'm supposed to be teaching myself) but I only know Excel so here we go:
Let's go from this first graph to the second graph:


The first thing you want to do is set up a simple table like the one on the left in the image below. You don't have to separate everything out into different columns, I just did that because I was doing this fast and it's way clearer for me to keep track of what I'm doing.
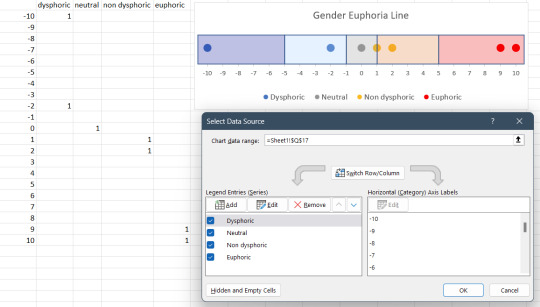
The second thing you wanna do is understand how graphs in Excel work: You have to define an X axis and a Y axis. For this graph style, called a CalTech plot, we only actually want to display data across the X axis, but we still need to define it on the Y axis so Excel understands we're trying to make a graph.
So the -10 to 10 is going to be our X axis data. The 1's in the other columns just give Y a value so we can get it on the graph. That's the basic set up.
So, add a scatter plot however you like, and then right click to edit the data. Add each data type into the plot as a separate Series. Set the X to be the -10 to 10, and the Y values to be the corresponding data column.
Now here's where the details come in. Initially, your graph will probably look like this:

That's terrible. There's no legend, the dots are tiny, there's a Y axis right in the middle and grid-lines etc... So let's fix it!
Double-click on the Y axis. If the dots are too high or too low you can adjust the Min and Max values on the menu that'll pop up on the right. I set my Min to -1 and my Max to 2. Once you're done, click on the Y axis and literally just hit Delete. It'll go away.
Same with the grid-lines: click 'em and delete 'em. You can also remove all these items through the [+] menu that shows up when you click on the graph OR on the top menu under Chart Design.
After that, we need to add the Legend and change the size of the dots.. You can add the legend and then change its position using the [+] menu or through the Chart Design menu. I have it displayed on the Bottom.
Once you've got that squared away, if you don't have the right hand menu up you need to double-click anywhere in the chart area get the it to show up. It should say "Format Chart Area". Single-click on one of your data points, and it changes to say "Format Data Series":

Click on the paint bucket, then click on Marker, then click on the > to make the Marker Options menu drop down and then you can finally change the size of the markers. I picked 10 because it's nice and visible. Do that for all your markers! Finally, you can click on the Legend itself and go to font size to increase it and make it more visible.
And now, the last step. The colored boxes? They're literally just boxes. Insert > Illustrations > Shapes, and click on the rectangle. Click on Shape Format on the main menu to adjust the Shape Fill under More Fill Colors, and set the Transparency to 50%. Copy-paste as many boxes as you want!
Done!
If you wanna play around, you can change the "level" of the dots which can be helpful for data sets with overlapping numbers:
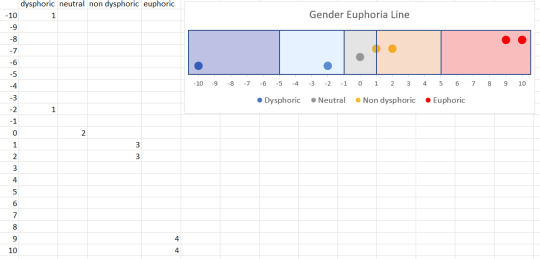
See how I changed the Y values to 1, 2, 3 and 4 in my table? I also had to change my Y-axis values to Min: -1 and Max: 5, but you can easily use the [+] menu to bring back the Y axis any time you need it, then delete it again.
13 notes
·
View notes
Text
i’m trying to make a graph. i don’t have excel. only google sheets or (shudders) numbers (which is the stupidest most ungoogleable thing to name your spreadsheet app, btw) i don’t understand what “data range” and “series” mean and why there is only x-axis but no y-axis.
i have resorted to writing code that would output my data set organised into csv format so i could paste it back into the spreadsheet and generate a chart without editing the data set there.
#i want to cry#personal drivel#i have lived in blissful ignorance of spreadsheets#i need spreadsheets 101#or a spreadsheet wizard#spreadsheets#hell
1 note
·
View note
Text
A Guide In Firefox to New And Creative CSS DevTools
Over the last few years, our team at
Firefox
has been operating on new CSS gear that address both cutting-edge strategies and age-old frustrations. We’re the Layout Tools team, a subset of Firefox Developer Tools, and our quest is to improve the modern-day internet layout workflow.
The internet has seen an first-rate evolution inside the final decade: new HTML/CSS functions, browser improvements, and design strategies. Our crew is dedicated to constructing gear that fit that innovation so that designers and developers can harness extra of the performance and creativity that’s now possible.
In this guide, we’ll proportion a top level view of our seven new equipment, with memories from the design system and realistic steps for trying out each tool.
1. Grid Inspector
It all started out three years in the past while our CSS format expert and dev advocate, Jen Simmons, labored with members of Firefox
DevTools
to construct a device that would aid customers in examining CSS Grid layouts.
As one of the most powerful new functions of the cutting-edge internet, CSS Grid had quick gained decent browser adoption, but it still had low internet site adoption. There’s a steep studying curve, and you nevertheless need fallbacks for sure browsers. Thus, part of our purpose turned into to help popularize Grid by way of giving developers a more hands-on manner to research it.
The middle of the device is a grid outline, overlaid at the page, which facilitates devs visualize how the grid is positioning their elements, and the way the layout modifications once they tweak their styles. We introduced numbered labels to identify each grid line, the capability to view up to 3 grids at once, and colour customization for the overlays. Recently, we also introduced support for subgrid, a modern day CSS specification implemented in Firefox and hopefully in extra browsers soon.
Grid Inspector changed into an idea for all of the tools that followed. It was even an notion for a brand new team: Layout Tools! Formed in late 2017, we’re unfold across 4 time zones and collaborate with many others in Mozilla, like our rendering engine builders and the best parents at MDN.
TRY OUT THE GRID INSPECTOR
In Firefox, go to our Grid example site.
Open the Inspector with Cmd + Shift + C.
Turn on Grid overlay through one of 3 ways:
Layout Panel:
In the Grid section, check the checkbox subsequent to .Content.Grid-content;
Markup View:
Toggle the “grid” badge next to ;
Rules View:
Click the button next to display:grid; inside
#page
-intro .Grid-content;
Experiment with the Grid Inspector:
Change the crimson overlay coloration to red;
Toggle “Line numbers” or “Extend strains infinitely”;
Turn on greater grid overlays;
See what takes place while you disable grid-gap: 15px in Rules.
2. The Editor of Form Path
The next project we have been working on has been the Shape Path Editor: our first visual editing tool.
CSS Shapes permits you to define shapes for textual content to drift around: a circle, a triangle, or a many-sided polygon. It can be used with the clip-path assets which permits you to trim elements to any of those equal shapes. These two techniques collectively open the opportunity for a few very specific graphic design-stimulated layouts.
However, creating these sometimes complicated shapes can be difficult. Typing all the coordinates manually and the use of the right CSS units is error-inclined and some distance eliminated from the creative mind-set that Shapes allows. Therefore, we made a device that allows you to edit your code through at once clicking and dragging shapes on the web page.
This kind of feature—visible editing—became new for us and browser tools in general. It’s an instance of how we will go beyond inspecting and debugging and into the world of design.
TRY OUT THE SHAPE PATH EDITOR
In Firefox, go to this web page at the An Event Apart website.
Open the Inspector with Cmd + Shift + C and pick out the first circular image.
In Rules, click on the icon subsequent to the shape-outside property.
On the web page, click on the factors of the shape and notice what happens while you drag to make the shape massive or tiny. Change it to a size that appears exact to you.
3. Text Reader
We have had a Fonts panel in Firefox for years which displays an informative list of all the fonts used in a website. We decided to convert this into a Font Editor to fine-tune the properties of a font by continuing our trend of designing in the browser.
A driving force behind this assignment become our purpose to support Variable Fonts at the same time that the Firefox rendering engine team changed into adding support for it. Variable Fonts gives font designers a way to offer fine-grained variations alongside axes, like weight, within one font file. It also supports custom axes, which offer each font creators and web designers an exceptional amount of flexibility. Our device routinely detects these custom axes and offers you a manner to alter and visualize them. This would otherwise require specialized websites like Axis-Praxis. Additionally, we added a characteristic that gives the ability to hover over a font name to spotlight in which that particular font is being used at the page. This is helpful because the manner browsers select the font used to render a bit of text can be complex and depend upon one’s computer. Some characters may be abruptly swapped out for a special font due to font subsetting. TRY OUT THE FONTS EDITOR
In Firefox, go to this variable fonts demo site.
Open the Inspector with Cmd + Shift + C and pick out the word “variable” within the title (the element’s selector is .Title__variable-web__variable).
In the 1/3 pane of the Inspector, navigate to the Fonts panel:
Hover over the font name Output Sans Regular to look what receives highlighted;
Try out the load and slant sliders;
Take a take a look at the preset font versions within the Instances dropdown menu.
4. Flexbox Inspector
Our Grid, Shapes, and Variable Fonts equipment can together electricity some very advanced graphic layout at the internet, but they’re still somewhat present day based on browser support. (They’re nearly there, however still require fallbacks.) We didn’t need to work most effective on new features—we were drawn to the problems that maximum web builders face on a every day basis.
So we started work at the Flexbox Inspector. Design-wise, this has been our most ambitious assignment, and it sprouted some new consumer research strategies for our team.
Like Grid, CSS Flexbox has a fairly steep learning curve while you first get started. It takes time to truely recognize it, and a lot of us hotel to trial and error to gain the layouts we need. At the beginning of the assignment, our team wasn’t even sure if we understood Flexbox ourselves, and we didn’t recognize what the main challenges have been. So we leveled up our understanding, and we ran a survey to discover what human beings wanted the most when it got here to Flexbox.
The outcomes had a big effect on our plans, making the case for complicated visualizations like grow/decrease and min/max. We continued operating with the community at some point of the task by means of incorporating remarks into evolving visual prototypes and Nightly builds.
The tool consists of two main parts: a highlighter that works just like the Grid Inspector’s, and a detailed Flexbox device inside the Inspector. The middle of the tool is a flex item diagram with sizing info.
With help from Gecko format engineers, we have been able to show the step-by-step size choices of the rendering engine to offer users a full image of why and the way a flex object ended up with a positive size.
Note: Learn the full tale of our design manner in “Designing the Flexbox Inspector”.
TRY OUT THE FLEXBOX INSPECTOR
In Firefox, visit Mozilla’s Bugzilla.
Open the Inspector with Cmd + Shift + C and pick out the element div.Inner (simply inside the header bar).
Turn on the Flexbox overlay through one of 3 ways:
Layout Panel:
In the Flex Container section, turn on the switch;
Markup View:
Toggle the “flex” badge next to ;
Rules View:
Click the button next to display:flex.
Use the Flex Container panel to navigate to a Flex Item known as nav#header-nav.
Note the sizes shown within the diagram and length chart;
Increase and reduce your browser’s width and see how the diagram modifications.
Interlude: Doubling Down On Research
As a small team and not using a formal person research support, we’ve regularly resorted to design-by-dogfooding: basing our critiques on our personal stories in using the tools. But after our achievement with the Flexbox survey, we knew we wanted to be better at collecting statistics to guide us. We ran a new survey to assist tell our subsequent steps. We crowdsourced a list of the 20 largest demanding situations faced by internet devs and asked our community to rank them using a max-diff format. When we discovered that the huge winner of the demanding situations was CSS Layout Debugging, we ran a follow-up survey on unique CSS insects to discover the largest pain points. We supplemented these surveys with user interviews and user testing. We also asked folks to rank their frustrations with browser developer tools. The clear pinnacle difficulty became moving CSS modifications returned to the editor. This became our subsequent project.
5. Changes Panel
The difficulty in shifting one’s work from a browser developer device to the editor is one of those age-old issues that we all just got used to. We were excited to make a easy and straight away usable solution.
Edge and Chrome DevTools got here out with versions of this device first. Ours is centered on assisting a wide range of CSS workflows: Launch DevTools, trade any patterns you want, and then export your modifications by means of either copying the overall set of changes (for collaboration) or simply one changed rule (for pasting into code). This improves the robustness of the whole workflow, such as our other format tools. And this is just a start: We recognize accidental refreshing and navigation from the web page is a huge source of facts loss, so a manner to bring persistence to the tool may be an essential next step. TRY OUT THE CHANGES PANEL
In Firefox, navigate to any website.
Open the Inspector with Cmd + Shift + C and pick an element.
Make some adjustments to the CSS:
Modify patterns inside the Rules pane;
Adjust fonts within the Fonts pane.
In the right pane of the Inspector, navigate to the Changes tab and do the following:
Click Copy All Changes, then paste it in a text editor to view the output;
Hover over the selector name and click Copy Rule, then paste it to view the output.
6. Inactive CSS
Our Inactive CSS feature solves one of the top troubles from our layout debugging survey on precise CSS bugs: “Why is this CSS assets now not doing anything?”
Design-wise, this feature is very simple—it grays out CSS that doesn’t affect the page, and shows a tooltip to give an explanation for why the property doesn’t have an effect. But we understand this can enhance efficiency and cut down on frustration. We have been bolstered by research from Sarah Lim and her colleagues who constructed a similar device. In their studies, they observed that novice builders had been 50�ster at building with CSS when they used a device that allowed them to ignore beside the point code.
In a way, that is our favorite sort of feature: A low-placing UX fruit that barely registers as a feature, however improves the complete workflow without actually wanting to be determined or learned. Inactive CSS launches in Firefox 70 but may be used now in prerelease variations of Firefox, consisting of Developer Edition, Beta, and Nightly. TRY OUT INACTIVE CSS
Download Firefox Developer Edition;
Open Firefox and navigate to
wikipedia.Org;
Open the Inspector with Cmd + Shift + C and choose the center content material area, called central-featured;
Note the grayed out vertical-align declaration;
Hover over the data icon, and click on “Learn extra” if you’re interested.
7. Accessibility Panel
Along the way we’ve had accessibility functions developed by means of a separate group that’s typically one person — Yura Zenevich, this year together with his intern Maliha Islam.Together they’ve turned the brand new Accessibility panel in Firefox into a powerful inspection and auditing tool. Besides displaying the accessibility tree and properties, you could now run different varieties of checks on a page. So far the checks include shade contrast, textual content labels, and keyboard attention styling.
Now in Nightly, you can strive the new shade blindness simulator which harnesses our upcoming WebRender tech.
TRY OUT THE ACCESSIBILITY PANEL
Download Firefox Developer Edition;
Navigate to
meetup.Com;
In the developer tools, navigate to the Accessibility tab, and click the “Turn on Accessibility Features” button;
Click the drop-down menu subsequent to “Check for problems” and pick out “All Issues”;
Take a have a look at the diverse contrast, keyboard, and text label troubles, and click the “Learn greater” links if you’re interested.
Next Up
We’re currently hard at paintings on a browser compatibility tool that uses facts from MDN to expose browser-specific problems for a particular element. You can follow along on GitHub to learn extra. The Future
We’re committed to helping the modern-day web, and that means continuously converting and growing. New specs get implemented via browser vendors all of the time. Guidelines and nice practices around progressive enhancement, responsiveness, and accessibility evolve constantly. Us device makers need to hold evolving too.
And what of the long-lived, ever-present troubles in creating the web? What ordinary user interfaces need to be rethought? These are a number of the questions that preserve us going!
What approximately a better manner to navigate the DOM tree of a page? That a part of DevTools has gone essentially unchanged since the Firebug days.
We’ve been experimenting with functions like again and forward buttons that might ease navigation between lately visited elements. A extra dramatic trade we’re discussing is including a compact DOM view that makes use of a syntax much like HTML templating engines. The attention could be on the most common use case—navigating to CSS—as opposed to viewing/enhancing the source.
We’ve additionally been thinking about a higher element selector. We realize how it can be more effective to work inside the web page, with much less jumping backward and forward into DevTools. We should make the detail selector extra effective and greater persistent. Perhaps it could choose whitespace on a page and tell you what causes that space, or it can shed mild at the relationships between extraordinary elements.
As a reputed Software Solutions Developer we have expertise in providing dedicated remote and outsourced technical resources for software services at very nominal cost. Besides experts in full stacks We also build web solutions, mobile apps and work on system integration, performance enhancement, cloud migrations and big data analytics. Don’t hesitate to
get in touch with us!
Source:
whizzystack.co
#b2b ecommerce
#b2b content marketing
#b2b seo
#b2b marketing blog
1 note
·
View note
Text
Sorting Data in Column Charts: Best Practices in PowerPoint and Excel
Data Visualization: Top Questions Answered
1.How do I edit a column chart in PowerPoint?
To edit a column chart in PowerPoint, click on the chart to select it. Then, use the Chart Tools on the toolbar to modify the design, layout, or format. You can right-click the chart to edit data, change the chart type, or adjust individual elements. Double-click the chart to open Excel for detailed data editing.
2. How do I animate a column chart in PowerPoint?
To animate a column chart in PowerPoint, select the chart, go to the "Animations" tab, and choose an animation effect from the gallery. You can customize the animation settings by clicking on "Animation Pane" and adjusting the timing and order. Use "Add Animation" to layer effects and preview your animation to see how it looks.
3. How do I make columns in Google PowerPoint?
To create columns in Google Slides (often referred to as Google PowerPoint), insert a text box by clicking on "Insert" > "Text box." Then, enter your text. To format it into columns, select the text box, click on "Format" > "Columns," and choose the number of columns you want. Adjust the text box size as needed.
4. What is column chart in PowerPoint?
A column chart in PowerPoint is a graphical representation of data using vertical bars. Each bar represents a category or value, making it easy to compare different data points visually. Column charts are useful for displaying trends over time or comparing quantities across various categories, enhancing the audience's understanding of the information presented.
5. How do I sort a column chart in PowerPoint?
To sort a column chart in PowerPoint, first click on the chart to select it. Then, right-click on the data series or axis you want to sort. Choose “Select Data,” and in the dialog box, adjust the order of the data series or categories. Alternatively, sort the data in Excel before importing it into PowerPoint for a more organized chart.
Visit: VS Website See: VS Portfolio
0 notes
Text
Set Chart Axis Properties & Text Handling Before/After Switches During Mail Merge using Java
What's New in this Release?
Aspose development team is happy to announce the monthly release of Aspose.Words for Java 17.12. 0. There are 91 improvements and fixes in this regular monthly release. The most notable are: PixelFormat property in ImageSaveOptions class, Metered License upgraded to REST API 1.2, Fixed few Veracode issues reported by user, Implemented API to set chart axis properties, Added feature to get the docPartGallery valze of StructuredDocumentTag of type SdtType.DocPartObj, Horizontal and vertical flipping attributes are now taken into account when rendering DML textboxes, Improved rendering of diacritics for “Courier New” font, Multiline MathML expressions rendering fixed, EMR_ROUNDRECT records processing while rendering metafiles fixed, PDF Rendering of indexed images while converting to CMYK color space fixed, OTF(CFF) fonts to PDF/A documents export fixed, DML Charts with empty area do not throw exception on rendering now, Fixed scaling problem with DML bubble charts on rendering, LINQ Reporting Engine supports dynamic setting of chart axes’ titles, Improved handling of decimal tab alignment in cells when paragraph has hanging indent, Improved text wrapping when line contains single or no characters, Improved handling of cell margins and table alignment, Improved cell alignment when line has trailing spaces and custom tabs, improved handling of collapsed paragraphs, Fixed exception in rare case when line break point cannot be found and Fixed exception when document is saved with revision balloons inside of a cell. If users want to work with chart axis, scaling, and display units for the value axis, please use ChartAxis, AxisDisplayUnit, and AxisScaling classes. Following article shows how to define X and Y axis properties. It has provided typed access to a merge field’s properties in this release of Aspose.Words. It has changed the return type of the FieldMergingArgsBase.Field property (and hence of the corresponding descendants’ properties) from Field to FieldMergeField. The list of new and improved features added in this release are given below
Implement PixelFormat property in ImageSaveOptions class in Aspose.Words for Java
Metered License code upgraded to REST API 1.2.
Add feature to Format X/Y/Z Axis of chart.
Add feature to format axis numbers of chart
Add feature to format axis (minimum and maximum bounds)
Add feature to set Axis Title of Chart using LINQ Reporting
Adding the chart axis label formatting.
Add feature to set/get "Specify interval unit" of axis label
Add feature to Format Axis Number
Add feature to get the docPartGallery value of StructuredDocumentTag of type SdtType.DocPartObj
Implement Aspose.Words for .NET Core
Add feature to support Aspose.Words for .NET Core 2.0
Different behavior of Section New Page Break in 16.7 and 17.11
Extra empty space appear after conversion from Docx to Pdf
Document.UpdateFields does not update the AUTOTEXT
Content shifts down to the pages in PDF
Empty page is created after section break in output Pdf
Identify elements close to page boarder.
Transparent images are lost in output Pdf
Text is shifted down to the page in output PDF
Wrong empty formula appears in document after accepting revisions
Shape's position is changed in output PDF
DOCX to PDF, table on page moved down
Contents are pushed down to the page in output PDF
Table's position is changed after conversion from Docx to Pdf
Simplified font is used instead of Traditional in Chinese (Taiwan) document
Rtf's text font is changed
Position of numbers in cell is changed after conversion from DOCX to PDF
Expose switches in MailMerge Field
Add exception when TableEnd field is missing
Add support for svgBlip drawing extension.
Check on summer 2015 // Doc to tiff conversion issue with text rendering issue
Merged cells are lost after when UpdateTableLayout method is called
/rounding/ Blank page is created after conversion from Docx to Pdf
TestCmykImageDefectJ21 is rendered to PDF incorrectly when ShowAllFormattingMarks are set to true
/text wrap/ Text moves after converting Word to PDF
/delete revisions balloons/ Failed to render revisions balloons when the last table row is deleted
Aspose Word hang when processing HTML
RTF to PDF, Issues with margins/indents
Image Rendering Issue
Document.UpdateFields does not stop (endless loop)
Chart get blurry when convert word to html
Borders specified for "colgroup" element are not applied to cell
RTF: Background image is lost for textboxes inlined with text
/Courier New + diacritics with non-zero advance/ Russian text accent rendering issue in resultant PDF
/Courier New + diacritics with non-zero advance/ Herbew text accent rendering issue in resultant PDF
Page number shifted to right in DOCX to PDF conversion
XmlMapping.SetMapping throws System.InvalidOperationException
DOCX to DOCX conversion issue with font of pie chart title
Footnote formatting is changed after joining RTF documents
/revisions/ List rendering issue in PDF document
DOCX to PDF rendering truncate the footer shape
Tables are not properly aligned in pdf output
Empty Area Chart. Exception is thrown when converting to PDF .
Cell's top border is lost after using Borders.Top
ImageSaveOptions.PageIndex is ignored when IPageSavingCallback is implements
System.ArgumentNullException when converting specific file
Symbol Field Color in Footer is lost in PDF conversion
Save as PDF Compliance PDF/A incorrectly includes OpenType Font
Incorrect inserting ole object as "htmlfile"
An exception raises when loading HTML document.
Position of cell's text is changed in output PDF
Text is rendered on next page in output PDF
Extra empty space is rendered in table's cell
Other most recent bug fixes are also included in this release
Newly added documentation pages and articles
Some new tips and articles have now been added into Aspose.Words for .NET documentation that may guide users briefly how to use Aspose.Words for performing different tasks like the followings.
How to Set Chart Axis Properties
How to Handle Text Before and After Switches During Mail Merge Operation
Overview: Aspose.Words
Aspose.Words is a word processing component that enables .NET, Java & Android applications to read, write and modify Word documents without using Microsoft Word. Other useful features include document creation, content and formatting manipulation, mail merge abilities, reporting features, TOC updated/rebuilt, Embedded OOXML, Footnotes rendering and support of DOCX, DOC, WordprocessingML, HTML, XHTML, TXT and PDF formats (requires Aspose.Pdf). It supports both 32-bit and 64-bit operating systems. You can even use Aspose.Words for .NET to build applications with Mono.
More about Aspose.Words
Homepage Java Word Library
Download Aspose.Words for Java
Online documentation of Aspose.Words
#Set Chart Axis Properties#Format X/Y/Z Axis of chart#format axis numbers of chart#Transparent images are lost#improved DOCX to PDF#DOCX to TIFF image rendering#Java Word Processing
0 notes
Text
Grayson Central Appraisal District
Additionally, 1.93% of the workforce in Grayson County, VA have "tremendous commutes" in extra of ninety minutes. The following chart shows the number of households utilizing every mode of transportation over time, utilizing a logarithmic scale on the y-axis to help better present variations in the smaller technique of commuting. This chart shows the variety of staff in Virginia across varied wage buckets compared to the national common. Members of the House of Representives are elected to 2-year phrases, and the following chart exhibits the how the members for Virginia have modified over time beginning in 2008.
Some counties permit renewals at substations or subcontractors, such as participating grocery shops. In Grayson County, the treasurer is also answerable for the sale of County Dog Tags, and reporting to our Animal Control Officer a list of county residents who've purchased them. The treasurer additionally works with local veterinarians to have Rabies Clinics all through the county. The treasurer’s office is also liable for the bi-monthly water/solid waste billing.
Whether it is appraising your house for a property tax attraction if your property taxes are too excessive, valuing your house for property work or a divorce or helping you secure a HELOC, an area appraiser is finest. They obviously also appraise new development properties as well as existing homes, and can do it for a house listing, before or after a sale. They use the local MLS (Multiple Listing Service) to assemble data on sales and listings and use them to professionally tell you what the worth per sq. foot should be on your residence and others in your space. They also can decide if there's any impact on the value of your home from pending foreclosures, REOs, and different "quick sales" in Grayson County. They can do an appraisal for VA, FHA, conventional, jumbo, and Fannie Mae or Freddie Mac purposes, and routinely provide these reviews on URAR, drive-by, and 1004 MC (1004 Market Condition) types as properly as others. We have actual property tax tax data for a complete of two-hundred-fifty-four Texas counties in addition to Grayson County.
It has the fifth-highest property taxes in the entire state, with a median effective rate of two.26%. That means that if your home is worth $200,000, you would count on to pay about $4,520 yearly in taxes. In the table beneath, we look at each county’s efficient tax fee, which is the same as the amount of property tax that owners actually pay as a proportion of their home’s value. The desk also contains the common annual tax fee and common house value in each Texas county.
We will offer you neighborhood sales knowledge over the last 12 months so you probably can decide if you wish to file a formal protest or rent a property value protest firm. The metropolis of Denton has some of the highest complete property taxes within the area. For some properties, you can easily discover the newest tax assessment by looking up the property handle with our property data search. You can also use our Grayson County Property Tax Calculator to estimate your property tax based mostly on median tax values (results open in new page).
This website makes knowledge obtained from third events out there in various formats, together with graphs and charts. You acknowledge and agree that the information presented on this web site isn't created or endorsed by O’Connor. The information offered is for basic grayson county property tax informational purposes solely and isn't supposed to supply tax or legal advice. You acknowledge that the data offered to you is obtained from sources believed to be dependable and that no guarantees are made as to its accuracy, completeness or timeliness.
If you should pay your property tax invoice, ask a few property tax assessment, lookup the Grayson County property tax due date, or find property tax information, visit the Grayson County Tax Assessor's page. Applications for the Grayson County homestead exemption, any property tax appeals, and purposes for a current use tax reduction must even be submitted to the Grayson County Assessor's Office. Statistics present that about 25% of homes in America are unfairly overassessed, and pay a mean of $1,346 an extreme quantity of in property taxes every year. This finances will elevate extra revenue from complete property taxes than final yr's price range by an quantity of $858,829 (8.1% increase). The property tax revenue to be raised from new property added to the tax roll this 12 months is $543,712.
0 notes